Monday, August 25, 2008

Handling Exceptions: Creating and using fault policies

Back then...and now
Prior to patch 10.1.3.3, we had to write fault handling code for each and every BPEL process we created. This was done at design time, and more often than not there was a great deal of overlap in the fault handling code for different processes. In essence, we merely ended up writing the same code over and over again. Reusability was thus non-existant as far as fault handling was concerned.

With the 10.1.3.3 patch things have turned over a new leaf. Now, you have the option of creating fault policies(fault handling) that can be applied to an entire domain. Besides, you can bind these policies to a BPEL process at different levels - partnerlink,port type, process and domain. The framework will use the binding in order of the following priority :
  • bpel.xml
  • policy defined on the server
The reader must note that a fault policy defined on the server will always takes precedence over one that is defined in the BPEL process(catch/catchall blocks), if at all one exists.

Designing a fault policy
A fault policy file defines fault conditions and their corresponding faultrecovery actions. Each fault condition specifies a particular fault or group of faults, which it attempts to handle, and the corresponding action for it. A set of actions is identified by an ID in the fault policy file. Please bear in mind that you can have only one fault-policy for a domain and it must be under SOA_ORACLE_HOME\bpel\domains\domain_name\config\fault-policies. You need to create the fault-policies directory under config as it does not exist by default.

The fault-policy file essentially consists of two sections - condition and action. The condition section is based on a faultName. Each condition has an optional test section and a mandatory action section. The test section tests the occurence of a particular fault and upon the test being true(when that fault has indeed occured ) an action is taken which again is defined in the same file. Several actions can be configured for a particular faultName.

For the purpose of demonstration I have created a fault-policy file which is as follows:
<?xml version="1.0" encoding="UTF-8"?><faultPolicy version="2.0.1" id="SankashPolicy" xmlns:env="http://schemas.xmlsoap.org/soap/envelope/" xmlns:xs="http://www.w3.org/2001/XMLSchema" xmlns="http://schemas.oracle.com/bpel/faultpolicy" xmlns:xsi="http://www.w3.org/2001/XMLSchema-instance"&gt;
<Conditions>
<faultName xmlns:bpelx="http://schemas.oracle.com/bpel/extension" name="bpelx:remoteFault">
<condition>
<action ref="ora-retry"/>
</condition>
<condition>
<action ref="ora-terminate"/>
</condition>
</faultName>
</Conditions>
<Actions>
<Action id="ora-retry">
<retry>
<retryCount>2</retryCount>
<retryInterval>2</retryInterval>
<exponentialBackoff/>
</retry>
</Action>
<Action id="ora-terminate">
<abort/>
</Action>
</Actions>
</faultPolicy>

If you scroll down to the conditions section you will notice that I am testing for remotefault. If a remoteFault does occur, my remedial action is to retry the connection twice at an interval of 2 seconds. If that does not yeild any result, the final action is terminate the process altogether.

Associating a fault policy
Now that we are done with creating the fault policy, we will see how to bind the policy with a process. As already mentioned the binding can occur at partnerlink, port type, process and domain level. To associate a policy at the process level you need to create the bindings in the bpel.xml file. However, if you want it at the domain level you need to specify the bindings in the fault-bindings.xml under SOA_ORACLE_HOME\bpel\domains\domain_name\config directory. Whichever association you want, the bindings are defined as follows:

<faultPolicyBindings version="2.0.1" xmlns="http://schemas.oracle.com/bpel/faultpolicy" xmlns:xsi="http://www.w3.org/2001/XMLSchema-instance"&gt;
<process faultPolicy="SankashPolicy"/>
<partnerLink faultPolicy="SankashPolicy"/>
</faultPolicyBindings>

In order that the BPEL process manager picks up the policy you created just now, restart the server.

Use case
To ascertain that the policy is indeed active, create a synchronous BPEL process(wihtout any catch/catchall) that simply calls a java web service. Compile and deploy it. Verify that it executes successfully. Now log in to the enterprise manager console and undeploy the web service that the process was calling. Now, again initiate the process. Open the Activity Audit Trail for the instance. Observe that the process gets terminated. See screenshot below.


Remember nowhere in the process we had written code to terminate it upon the occurence of a remote fault. Evidently, the policy must have caused it to do so.

Friday, August 22, 2008

Handling database package migrations in BPEL

The catch
Recently while working on an integration project for a client, I was told that the custom database packages my BPEL process was referencing needed to be moved to a different database schema. Migration of the packages was promptly done. All that remained was tweaking the BPEL process so that it referenced the packages under the new schema. Since I had used server-side JNDI, my first impression was resetting the data source to the new schema would do the trick. As it turned out, that was not the only thing I needed to do, but a few more.

Recofigure the run-time connection
The first step is to reset the data source so that it points to the new schema. This is fairly easy. Since every data source is tied to a connection pool, it is in essence the connection pool that needs to be changed. To do that, first, log on to the enterprise manager and then modify the existing connection pool by resetting the jdbc url, user name and password. Save the changes. If you insist on creating a new connection pool altogether for better readability, by all means do so. But don't forget to tie it to the data source you are referring to from the JNDI name.

Reset the JCA operation
Go to your BPEL project and open the WSDL files for all the database adapters that were referring to the old schema. Scroll down to the jca:operation tag. You will find something like this:

<jca:operation
SchemaName="APPS"
PackageName="XXALV_BPEL_UTILITY_LIB_PKG" ProcedureName="SUBMIT_JOURNAL_IMPORT" InteractionSpec="oracle.tip.adapter.db.DBStoredProcedureInteractionSpec" > </jca:operation>

Notice that the SchemaName is set to the one you were referring to previously. Reset it to the new schema name. For instance, in my case the new schema is BOLINF. Thus, I will set it as:

...
SchemaName="BOLINF"
...

Leave everything else the same.

Compile and redeploy
You are done. Save the changes and deploy the process. It should now pick up the packages under the new schema.

Gotchas
Most of the time your procedures will call other procedures and functions that may not be under the same schema as your packages are. In such cases your schema will need privileges to perform operations on objects that are outside your schema. Be sure to ask the DBA to grant you the necessary permissions. Also, it is recommended that you qualify all the database objects you create with the schema name so that all references are made explicit.

Thursday, August 21, 2008

WSIF Revisited: Bottom up development using JDeveloper

Oversight....
In the previous post, I had elucidated how to call Java using WSIF. But, an oversight on my part caused the things to look a trifle more complicated than they actually were. Here is an attempt restore some sanity.


Create the Class
First, you need to create the Java class. Launch JDeveloper and create a new Java class. For ease of writing, I shall use the same class as that in the previous post. The class's task is to concatenate one string with another.


Here is the Java snippet:

package com.nebulasky.blogspot;
public class ConcatString {
public ConcatString() { }
public String getConcatenation(String input){
return "Hello " + input;
}
}

Generate the contract
A peek into the earlier post and you will realize that we had then created the contract manually, when in fact we could have done it with a JDeveloper wizard (the oversight I was blabbering about). Right click the Java source from the context menu of the project and click 'Create J2EE Web Service'


In the first step of the wizard check the WSIF Binding uncheck the SOAP 1.1 Binding (this is checked by default).


Once these are done, finish the wizard. Open the WSDL thus generated and have a look. Scroll down to the service tag and you should see something like this:

<service name="WSIFConcatService">
<port name="WSIFConcatServiceWSIFPort" binding="tns:WSIFConcatServiceWSIF">
<java:address className="com.nebulasky.blogspot.ConcatString"/>
</port>
</service>

Note java:address tag. It specifies a class name instead of a SOAP address which is how it would have been if you had chosen SOAP binding. Additionally, will also find some new tags like format:typeMap, format:typeMapping, java:binding and java:operation. For more information on these, visit my previous post.

Deploying the classes
Next, you load the com.nebulasky.blogspot.ConcatString class onto the application server. For this simply copy the class and put it &lt;BPEL_HOME>/system/classes directory. Restart the server.

Create the BPEL process
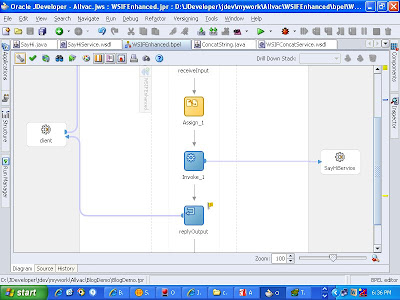
Create a synchronous BPEL process and create a new partnerlink. Import the WSDL from the local file system into the BPEL project directory. Assign the appropriate fields like operation, partnerR, myRole etc. Now drag an invoke activity and bind it with the service. Here is how the BPEL process will look like:


Deploy and test
Deploy the process and test it. Provided everything is in place, it should return the expected response.


Wednesday, August 20, 2008

WSIF: Calling native Java code from BPEL

What's the deal?
The alternatives to calling Java from BPEL aren't legion. Infact, there are only three.
  1. Using Java embedding to call the code directly
  2. Wrapping the code in a SOAP service
  3. Calling the code using Web Service Invocation Framework
Thus, it becomes all the more important to make a judicious choice amogst the three. The subject matter of this post is to acquaint the reader with calling native Java code using WSIF. But before moving on, it makes perfect sense to look at the pros and cons of all the three.

The pros and cons
Java Embedding: This is an out of box feature provided by BPEL to aid the developer to write and use Java snippets inside the BPEL environment. The greatest advantage is it lets the developer have full access to the entire BPEL environment. Consequently, direct manipulation of data inside the process is fairly easy. Add to it the ease of use, since you don't need to create auxiliary artifacts that you need with the other approaches, you are spared a lot of effort. On the flip side, it makes the BPEL code a little unreadable as you have mixed up Java with the BPEL tags. Use this to do seemingly simple tasks with short Java snippets.

SOAP Service: If you already have the Java code, wrapping it up as a SOAP service with JDeveloper is a peice of cake. Advantage is it lends a lot of reusability to the code and keeps your BPEL process clean. The disadvantage is that the reusability comes at a cost. You have to bear with the SOAP overhead, which can be tremendous especially if you are running a BPEL process that is swamped with SOAP calls. Use this when the service needs to be accessible from multiple machines and different BPEL processes or other applications.

WSIF: Without compromising much on readabiliy and resusability, WSIF provides a cleaner approach to use native code. By keeping the code separate from BPEL it makes sure that readability isn't sacrificed. Also, it calls the code directly, thereby eliminating the SOAP overhead altogether. Finally the code can easily be re-used by other BPEL processes by deploying the jar file containing the java classes and the WSDL document as part of a BPEL suitcase.

Prerequisites
Now that we have looked into the inherent positives and negatives of the three approaches, lets get ahead with the subject matter of this post - using WSIF to call java code. For the sake of demonstration, I shall use a Java class that takes a string as a parameter and concatenates it with another string. Here is code:

package com.nebulasky.blogspot;
public class ConcatString {

public ConcatString() { }
public String getConcatenation(String input)
{
return "Hello " + input;
}
}

Now, use JDeveloper and publish this as a J2EE service. Deploy and test it. Create a BPEL process and invoke this service. Fairly simple. Once these are done, we are all set to bring WSIF into the picture.

The WSIF file
To reiterate our purpose, we are going to tweak the BPEL to use WSIF to call the Java class instead of using SOAP. It makes sense to look at the WSDL file for the J2EE service. Of special interest is the binding section of the WSDL, since this tells our BPEL process how to call the service. I have omitted the rest of the file for simplicity, as they simply specify the data format for the messages. Here is an excerpt from the WSDL:

<binding name="ConcatenationSoapHttp" type="tns:Concatenation">
<soap:binding style="document" transport="http://schemas.xmlsoap.org/soap/http"/>
<operation name="getConcatenation">
<soap:operation soapAction="http://blogspot.nebulasky.com/getConcatenation"/>
<input> <soap:body use="literal"/>
</input>
<output>
<soap:body use="literal"/> </output> </operation>
</binding>

Notice that SOAP binding is being used (soap:binding, soap:operation , soap:body tags). All we need to do to persuade the BPEL to use WSIF is to change the binding information without changing the structure of the contract. As long as the contract is the same and references the same operations that the Java class exposes, and the messages in the contract are in conformance with the data types and parameters of the class, changing the binding will only change the way the BPEL communicates with the class, nothing else.

Definitions tag
Open the WSDL for the J2EE service in JDeveloper. Click on the source tab because you are going to edit it. Start by defining the two namespaces used by WSIF providers in the root element of the WSDL document, the tag. The format namespace is used to define the type mappings and the java namespace to define the operation mappings and the full name of the Java class:

<definitions name="Concatenation" targetNamespace="http://blogspot.nebulasky.com/" xmlns="http://schemas.xmlsoap.org/wsdl/" xmlns:tns="http://blogspot.nebulasky.com/" xmlns:soap12="http://schemas.xmlsoap.org/wsdl/soap12/" xmlns:mime="http://schemas.xmlsoap.org/wsdl/mime/" xmlns:tns0="http://blogspot.nebulasky.com/types/" xmlns:xsd="http://www.w3.org/2001/XMLSchema" xmlns:format="http://schemas.xmlsoap.org/wsdl/formatbinding/" xmlns:java="http://schemas.xmlsoap.org/wsdl/java/" xmlns:soap="http://schemas.xmlsoap.org/wsdl/soap/">

Map Java types to XML Schema definitions
To generate Java to XML mapping we need to create XML facades. These façades are Oracle BPEL Process Manager's original Java-to-XML binding for WSIF. XML façades are a set of Java interfaces and classes through which you can access and modify XML data stored in BPEL variables in a relatively easy way using get/set methods. Here we need the mappings for the WSDL file for the J2EE service. For this, you need to use the schema compiler utility called schemac as:

C:\com\nebulasky\blogspot\>schemac Concatenation.wsdl

First, you indicate to the BPEL process that it is bound to native Java code and not to a SOAP service. This is how you do it:

<binding name="JavaBinding" type="tns:WSIFTestProcess">
<java:binding/>

Next, you specify that XSD types will be mapped onto Java types. For this use the format:typeMapping tag. Then you define what Java types shall be used for what xsd types by using the format:typeMap tag. Here is the snippet that does these two tasks for you:

<format:typeMapping encoding="Java" style="Java">
<format:typeMap typeName="xsd:string" formatType="String"/> </format:typeMapping>

Mapping Java methods to WSDL operations
The final step is now to map the Java method calls onto the WSDL operations. This is done using the java:operation tag to identify which Java method should be used to support a given operation:

<operation name="getConcatenation">
<java:operation methodName="getConcatenation"/>
<input/>
<output/>
</operation>
</binding>

Define the Service
We are through with most of it now. All that remains is defining the service. Here you will provide a Java address unlike a SOAP address which is how it was untill recently:

<service name="Concatenation"> <port name="JavaPort" binding="tns:JavaBinding">
<java:address className="com.nebulasky.blogspot.ConcatString"/>
</port>

Deploy the class
For it to work at runtime then the Process Manager must be able to find the Java classes referenced in the WSIF. When using WSIF the classpath for the invoked WSIF service is different to the classpath for the BPEL process. It is necessary to move the classes to the <BPEL_HOME>/system/classes directory. Here the classes are the the ones generated by the schemac command and the class responsible for the concatenation.

Test the process
If it is not already thus, ensure that the BPEL process takes the Concatenation.wsdl file from the current directory and not from the Web service itself. The bpel.xml file should look like this:

<partnerLinkBinding name="Concatenation"> <property name="wsdlLocation">Concatenation.wsdl</property>
</partnerLinkBinding>

Test the process. It should give you the expected result.