The debate sorrounding SOA(Service Oriented Architechture) and WOA(Web Oriented Architecture) is getting fiercer by the day and the blogosphere is abuzz with pundits claiming that WOA is the *in* thing citing plethora of reasons like simplicity, cost-effectiveness, decreased time to market, better manageability and so on. So, where does that lead SOA to - on the way to extinction? I don't think so.
To set the record straight, there seems to be a lot of misconceptions about both SOA and WOA - may think of them as a technology or an offshoot thereof. This is fundamentally wrong. They are, in fact, different architectural styles, or simply put two different way of doing things. And like similar styles in the same ecosystem, each has its own advantages and shorcomings. To simply put one ahead of the other, which is what is happening, is fundamentaly flawed.
Recently, while perusing an article in InformationWeek I came across some interesting stats about SOA. Let me share them with you.
"IT pros have expressed skepticism about SOA's promised return on investment. A 2007 InformationWeek Web survey of 278 IT pros found that 32% of those using SOA said those projects fell short of expectations. Of those, 58% said their SOA projects introduced more complexity into their IT environments, and 30% said they cost more than expected. Out of all respondents using SOAs, just 10% said the results exceeded expectations."
These are what the figures say, but what is indeed the fact? Well, the fact is that for a relatively new concept as SOA to stake claim to its usefulness in the market, it needs to spend a fair share of time in the market. If you look back 10-15 years from now, you will realize that its precursors like DCOM, CORBA had received the same lukewarm response. I do not put blame on organizations when they claim that the cost of implementing SOA far outweighs its usefullness, but such a statement can only be true for a small organization with relatively smaller number of offerings in their portfolio and when there aren't any pressing complexities. In such cases, it might make sense to go with an alternative to SOA, perhaps WOA.
Interestingly, Gartner Research defines WOA as "a subset of SOA". If you're using WOA, you are in anyway using SOA but not vice-versa. This again brings to fore the fact the debate between the two is on flawed grounds. In fact, for enterprises it is more of a choice between the two - or still better a mix of both, depending on their tech landscape. When it comes to service-enable a company's offerings, SOA (or WOA for that matter) should not be the default choice. A comprehensive study of what needs to be achieved is of utmost importance and this must the done first. Only after considerable thought has gone into this a choice should me made. For start ups and small companies that do not need complex integrations among disparate systems, WOA should be the approach, inasmuch as it is less complex and inexpensive to implement. Investing big money to set up SOA when such a set up serves no real advantage is totally uncalled for. For large oraganizations where huge integration setups are needed, WOA will be unsuaitable. It makes more sense to invest upfront on SOA and then reap the fruits in the long run.
So, it is not as much about SOA vs WOA as it is about the choice between the two. The approach should depend on what is desired and exactly what should be used to reach that goal. Ideally, a design should start with WOA and then add up SOA as and when the need so arises. In conclusion, the two are not diametric as they have been falsely portrayed to be, but are complementary.
Wednesday, August 27, 2008
Tuesday, August 26, 2008
REST Web Services demystified
The cacophony
Recenlty, a lot of dissonance has sorrounded the debate betwee REST(Representational State Transfer) styled web services and SOAP. In fact, proponents of REST group have even gone to the extent of procaliming that it is quickly gaining ground and will one day become the de facto standard of creating web services, forcing SOAP into oblivion in the process. The internet is abuzz with claims that SOA (based on SOAP) is a thing of the past and WOA (Web Oriented Architecture based on REST) is the future. Not wanting to be left behind, the exponets of the SOAP, on the other hand, want to leave no stone unturned to prove the others wrong. Whatever the noises may sound like it makes sense to look into REST. So, here is the REST story
What are REST styled web services?
As already stated, REST stands for Representational State Transfer. REST basically means that each unique URL is a representation of some object. You can get the contents of that object using an HTTP GET. Other operations such as POST, PUT can be used to modify the object. In essence, REST it is the repsentation of the current state of a resource on the web.
The debate between REST and SOAP
While SOAP services are built on top of host of specifications laid down by OASIS, REST declares that the already existing WEB 2.0 standards are sufficient to build robust web services. Also, a major faction of REST supporters believe that using HTTP to piggyback payloads like SOAP does, is against the rationale of HTTP and an abuse to the protocol. It also brings in intricate complexities especially on the security front. One worth mentioning is piggybacking allows SOAP messages to get past firewalls and thereby places an additional constraint of detecting piggybacked payloads and scanning them prior to letting them in within the enterprise, which is not what firewalls are innately intended for. This is the main reason why both factions have always been at loggerheads with each other. More on this later.
Benefits of REST
Irrescpective of what the critics say there are some advantages that REST offers over SOAP. We shall now look at a few of them.
Simpler Interface
The REST methodology uses the URI(the way you send requests from your browser to a web site) for its implementation. Thus any request/response is a simple HTTP request/response. This keeps things simple, for nearly all applications on the web support HTTP. Thus, any application that supports HTTP can fundamentally produce and consume REST services. Contrast this with SOAP services, which have to adhere to specifications that go beyond HTTP thereby making it more complicated. Request/response are sent/received in SOAP envelopes which are XML that sit on HTTP for trnasport. So, there is the extra work involved in creating the SOAP request and parsing the response.
Light weight
From the above point it follows, that SOAP needs an additional XML wrapper above and over HTTP. This is unlike REST which is simple HTTP resquest/response. This can result in significant bandwith savings, especially for enterprises whose porfolio has umpteen applications interaction with each other at a massive level.
Security
Since firewalls are intended to restrict traffic by looking at the HTTP command in the request, it becomes inherently easy to apply security policies for REST services. For instance, if a GET operation was used, it can be considered safe since it can't, by definition, modify or alter data. It is here that SOAP can take liberties with the HTTP protocol. SOAP generally use POST and unless one has a good long look at the SOAP envelope, security apprehensions can't be put to rest. Since looking into SOAP messages is not a feature provided by fire walls, one needs to do extra work to enforce security at this level
REST service support in Oracle
In Oracle AS 10.1.3, you can use the command line Web Services Assembler (WSA) in conjunction with ANT or use JDeveloper (10.1.3) wizards to create and test REST services. The rest of the post describes how to create REST services with JDeveloper.
Creating REST services with JDeveloper
For the purpose of demonstration I shall use a simple class that concatenates one string with another and then publish it as a REST web service. Here is my class:
package com.nebulasky.blogspot;
public class HelloWorld {
public HelloWorld() { }
public String sayHi(String s){
return "Hello "+ s; }
}
Once this you have created the class, go back to the application navigator. Right click the context menu of the source java file and click 'Create J2EE web service'. In the second step of the wizard select the checkbox for REST Support (as seen in figure below) in the Java Web Service Wizard.

You can now click 'Finish' to complete creating the serb service. Deploy the service.
Testing the REST Service
You can test the process from the Enterprise Manager console by clicking on the 'Invoke REST POST' or 'Invoke REST GET'

Or you can even create the HTTP request and pass parameters using a query string. In my case it is
http://172.28.0.54:7777/BlogDemo-RESTHelloService-context-root/SayHiServiceSoap12HttpPort/sayHi?s=sankash
You should see something as this

Monday, August 25, 2008
Handling Exceptions: Creating and using fault policies
Back then...and now
Prior to patch 10.1.3.3, we had to write fault handling code for each and every BPEL process we created. This was done at design time, and more often than not there was a great deal of overlap in the fault handling code for different processes. In essence, we merely ended up writing the same code over and over again. Reusability was thus non-existant as far as fault handling was concerned.
The fault-policy file essentially consists of two sections - condition and action. The condition section is based on a faultName. Each condition has an optional test section and a mandatory action section. The test section tests the occurence of a particular fault and upon the test being true(when that fault has indeed occured ) an action is taken which again is defined in the same file. Several actions can be configured for a particular faultName.

Prior to patch 10.1.3.3, we had to write fault handling code for each and every BPEL process we created. This was done at design time, and more often than not there was a great deal of overlap in the fault handling code for different processes. In essence, we merely ended up writing the same code over and over again. Reusability was thus non-existant as far as fault handling was concerned.
With the 10.1.3.3 patch things have turned over a new leaf. Now, you have the option of creating fault policies(fault handling) that can be applied to an entire domain. Besides, you can bind these policies to a BPEL process at different levels - partnerlink,port type, process and domain. The framework will use the binding in order of the following priority :
- bpel.xml
- policy defined on the server
The reader must note that a fault policy defined on the server will always takes precedence over one that is defined in the BPEL process(catch/catchall blocks), if at all one exists.
Designing a fault policy
A fault policy file defines fault conditions and their corresponding faultrecovery actions. Each fault condition specifies a particular fault or group of faults, which it attempts to handle, and the corresponding action for it. A set of actions is identified by an ID in the fault policy file. Please bear in mind that you can have only one fault-policy for a domain and it must be under SOA_ORACLE_HOME\bpel\domains\domain_name\config\fault-policies. You need to create the fault-policies directory under config as it does not exist by default.
The fault-policy file essentially consists of two sections - condition and action. The condition section is based on a faultName. Each condition has an optional test section and a mandatory action section. The test section tests the occurence of a particular fault and upon the test being true(when that fault has indeed occured ) an action is taken which again is defined in the same file. Several actions can be configured for a particular faultName.
For the purpose of demonstration I have created a fault-policy file which is as follows:
<?xml version="1.0" encoding="UTF-8"?><faultPolicy version="2.0.1" id="SankashPolicy" xmlns:env="http://schemas.xmlsoap.org/soap/envelope/" xmlns:xs="http://www.w3.org/2001/XMLSchema" xmlns="http://schemas.oracle.com/bpel/faultpolicy" xmlns:xsi="http://www.w3.org/2001/XMLSchema-instance">
<Conditions>
<condition>
<action ref="ora-retry"/>
</condition>
<condition>
<action ref="ora-terminate"/>
</condition>
</faultName>
</Conditions>
<Actions>
<Action id="ora-retry">
<retry>
<retryCount>2</retryCount>
<retryInterval>2</retryInterval>
<exponentialBackoff/>
</retry>
</Action>
<Action id="ora-terminate">
<abort/>
</Action>
</Actions>
</faultPolicy>
If you scroll down to the conditions section you will notice that I am testing for remotefault. If a remoteFault does occur, my remedial action is to retry the connection twice at an interval of 2 seconds. If that does not yeild any result, the final action is terminate the process altogether.
Associating a fault policy
Associating a fault policy
Now that we are done with creating the fault policy, we will see how to bind the policy with a process. As already mentioned the binding can occur at partnerlink, port type, process and domain level. To associate a policy at the process level you need to create the bindings in the bpel.xml file. However, if you want it at the domain level you need to specify the bindings in the fault-bindings.xml under SOA_ORACLE_HOME\bpel\domains\domain_name\config directory. Whichever association you want, the bindings are defined as follows:
<faultPolicyBindings version="2.0.1" xmlns="http://schemas.oracle.com/bpel/faultpolicy" xmlns:xsi="http://www.w3.org/2001/XMLSchema-instance">
<faultPolicyBindings version="2.0.1" xmlns="http://schemas.oracle.com/bpel/faultpolicy" xmlns:xsi="http://www.w3.org/2001/XMLSchema-instance">
<process faultPolicy="SankashPolicy"/>
<partnerLink faultPolicy="SankashPolicy"/>
</faultPolicyBindings>
In order that the BPEL process manager picks up the policy you created just now, restart the server.
Use case
Use case
To ascertain that the policy is indeed active, create a synchronous BPEL process(wihtout any catch/catchall) that simply calls a java web service. Compile and deploy it. Verify that it executes successfully. Now log in to the enterprise manager console and undeploy the web service that the process was calling. Now, again initiate the process. Open the Activity Audit Trail for the instance. Observe that the process gets terminated. See screenshot below.

Remember nowhere in the process we had written code to terminate it upon the occurence of a remote fault. Evidently, the policy must have caused it to do so.
Friday, August 22, 2008
Handling database package migrations in BPEL
The catch
Recently while working on an integration project for a client, I was told that the custom database packages my BPEL process was referencing needed to be moved to a different database schema. Migration of the packages was promptly done. All that remained was tweaking the BPEL process so that it referenced the packages under the new schema. Since I had used server-side JNDI, my first impression was resetting the data source to the new schema would do the trick. As it turned out, that was not the only thing I needed to do, but a few more.
Recofigure the run-time connection
The first step is to reset the data source so that it points to the new schema. This is fairly easy. Since every data source is tied to a connection pool, it is in essence the connection pool that needs to be changed. To do that, first, log on to the enterprise manager and then modify the existing connection pool by resetting the jdbc url, user name and password. Save the changes. If you insist on creating a new connection pool altogether for better readability, by all means do so. But don't forget to tie it to the data source you are referring to from the JNDI name.
Reset the JCA operation
Go to your BPEL project and open the WSDL files for all the database adapters that were referring to the old schema. Scroll down to the jca:operation tag. You will find something like this:
<jca:operation
SchemaName="APPS"
PackageName="XXALV_BPEL_UTILITY_LIB_PKG" ProcedureName="SUBMIT_JOURNAL_IMPORT" InteractionSpec="oracle.tip.adapter.db.DBStoredProcedureInteractionSpec" > </jca:operation>
Notice that the SchemaName is set to the one you were referring to previously. Reset it to the new schema name. For instance, in my case the new schema is BOLINF. Thus, I will set it as:
...
SchemaName="BOLINF"
...
Leave everything else the same.
Compile and redeploy
You are done. Save the changes and deploy the process. It should now pick up the packages under the new schema.
Gotchas
Most of the time your procedures will call other procedures and functions that may not be under the same schema as your packages are. In such cases your schema will need privileges to perform operations on objects that are outside your schema. Be sure to ask the DBA to grant you the necessary permissions. Also, it is recommended that you qualify all the database objects you create with the schema name so that all references are made explicit.
Thursday, August 21, 2008
WSIF Revisited: Bottom up development using JDeveloper
Oversight....
In the previous post, I had elucidated how to call Java using WSIF. But, an oversight on my part caused the things to look a trifle more complicated than they actually were. Here is an attempt restore some sanity.
Create the Class
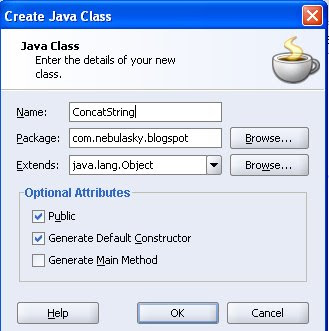
First, you need to create the Java class. Launch JDeveloper and create a new Java class. For ease of writing, I shall use the same class as that in the previous post. The class's task is to concatenate one string with another.
Here is the Java snippet:
package com.nebulasky.blogspot;
public class ConcatString {
public ConcatString() { }
public String getConcatenation(String input){
return "Hello " + input;
}
}
Generate the contract
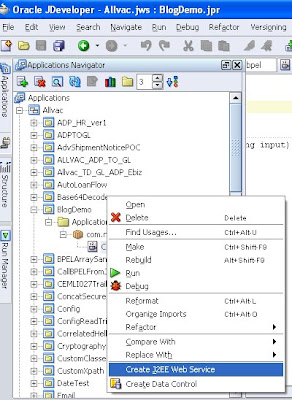
A peek into the earlier post and you will realize that we had then created the contract manually, when in fact we could have done it with a JDeveloper wizard (the oversight I was blabbering about). Right click the Java source from the context menu of the project and click 'Create J2EE Web Service'
In the first step of the wizard check the WSIF Binding uncheck the SOAP 1.1 Binding (this is checked by default).
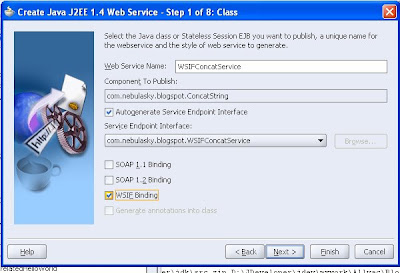
Once these are done, finish the wizard. Open the WSDL thus generated and have a look. Scroll down to the service tag and you should see something like this:
<service name="WSIFConcatService">
<port name="WSIFConcatServiceWSIFPort" binding="tns:WSIFConcatServiceWSIF">
<java:address className="com.nebulasky.blogspot.ConcatString"/>
</port>
</service>
Note java:address tag. It specifies a class name instead of a SOAP address which is how it would have been if you had chosen SOAP binding. Additionally, will also find some new tags like format:typeMap, format:typeMapping, java:binding and java:operation. For more information on these, visit my previous post.
Deploying the classes
Next, you load the com.nebulasky.blogspot.ConcatString class onto the application server. For this simply copy the class and put it <BPEL_HOME>/system/classes directory. Restart the server.
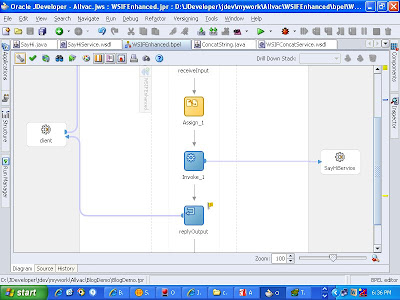
Create the BPEL process
Create a synchronous BPEL process and create a new partnerlink. Import the WSDL from the local file system into the BPEL project directory. Assign the appropriate fields like operation, partnerR, myRole etc. Now drag an invoke activity and bind it with the service. Here is how the BPEL process will look like:
Deploy and test
Deploy the process and test it. Provided everything is in place, it should return the expected response.
In the previous post, I had elucidated how to call Java using WSIF. But, an oversight on my part caused the things to look a trifle more complicated than they actually were. Here is an attempt restore some sanity.
Create the Class
First, you need to create the Java class. Launch JDeveloper and create a new Java class. For ease of writing, I shall use the same class as that in the previous post. The class's task is to concatenate one string with another.

Here is the Java snippet:
package com.nebulasky.blogspot;
public class ConcatString {
public ConcatString() { }
public String getConcatenation(String input){
return "Hello " + input;
}
}
Generate the contract
A peek into the earlier post and you will realize that we had then created the contract manually, when in fact we could have done it with a JDeveloper wizard (the oversight I was blabbering about). Right click the Java source from the context menu of the project and click 'Create J2EE Web Service'

In the first step of the wizard check the WSIF Binding uncheck the SOAP 1.1 Binding (this is checked by default).

Once these are done, finish the wizard. Open the WSDL thus generated and have a look. Scroll down to the service tag and you should see something like this:
<service name="WSIFConcatService">
<port name="WSIFConcatServiceWSIFPort" binding="tns:WSIFConcatServiceWSIF">
<java:address className="com.nebulasky.blogspot.ConcatString"/>
</port>
</service>
Note java:address tag. It specifies a class name instead of a SOAP address which is how it would have been if you had chosen SOAP binding. Additionally, will also find some new tags like format:typeMap, format:typeMapping, java:binding and java:operation. For more information on these, visit my previous post.
Deploying the classes
Next, you load the com.nebulasky.blogspot.ConcatString class onto the application server. For this simply copy the class and put it <BPEL_HOME>/system/classes directory. Restart the server.
Create the BPEL process
Create a synchronous BPEL process and create a new partnerlink. Import the WSDL from the local file system into the BPEL project directory. Assign the appropriate fields like operation, partnerR, myRole etc. Now drag an invoke activity and bind it with the service. Here is how the BPEL process will look like:
Deploy and test
Deploy the process and test it. Provided everything is in place, it should return the expected response.
Wednesday, August 20, 2008
WSIF: Calling native Java code from BPEL
What's the deal?
The alternatives to calling Java from BPEL aren't legion. Infact, there are only three.
The pros and cons
Java Embedding: This is an out of box feature provided by BPEL to aid the developer to write and use Java snippets inside the BPEL environment. The greatest advantage is it lets the developer have full access to the entire BPEL environment. Consequently, direct manipulation of data inside the process is fairly easy. Add to it the ease of use, since you don't need to create auxiliary artifacts that you need with the other approaches, you are spared a lot of effort. On the flip side, it makes the BPEL code a little unreadable as you have mixed up Java with the BPEL tags. Use this to do seemingly simple tasks with short Java snippets.
SOAP Service: If you already have the Java code, wrapping it up as a SOAP service with JDeveloper is a peice of cake. Advantage is it lends a lot of reusability to the code and keeps your BPEL process clean. The disadvantage is that the reusability comes at a cost. You have to bear with the SOAP overhead, which can be tremendous especially if you are running a BPEL process that is swamped with SOAP calls. Use this when the service needs to be accessible from multiple machines and different BPEL processes or other applications.
WSIF: Without compromising much on readabiliy and resusability, WSIF provides a cleaner approach to use native code. By keeping the code separate from BPEL it makes sure that readability isn't sacrificed. Also, it calls the code directly, thereby eliminating the SOAP overhead altogether. Finally the code can easily be re-used by other BPEL processes by deploying the jar file containing the java classes and the WSDL document as part of a BPEL suitcase.
Prerequisites
Now that we have looked into the inherent positives and negatives of the three approaches, lets get ahead with the subject matter of this post - using WSIF to call java code. For the sake of demonstration, I shall use a Java class that takes a string as a parameter and concatenates it with another string. Here is code:
package com.nebulasky.blogspot;
public class ConcatString {
public ConcatString() { }
public String getConcatenation(String input)
{
return "Hello " + input;
}
}
Now, use JDeveloper and publish this as a J2EE service. Deploy and test it. Create a BPEL process and invoke this service. Fairly simple. Once these are done, we are all set to bring WSIF into the picture.
The WSIF file
To reiterate our purpose, we are going to tweak the BPEL to use WSIF to call the Java class instead of using SOAP. It makes sense to look at the WSDL file for the J2EE service. Of special interest is the binding section of the WSDL, since this tells our BPEL process how to call the service. I have omitted the rest of the file for simplicity, as they simply specify the data format for the messages. Here is an excerpt from the WSDL:
<binding name="ConcatenationSoapHttp" type="tns:Concatenation">
<soap:binding style="document" transport="http://schemas.xmlsoap.org/soap/http"/>
<operation name="getConcatenation">
<soap:operation soapAction="http://blogspot.nebulasky.com/getConcatenation"/>
<input> <soap:body use="literal"/>
</input>
<output>
<soap:body use="literal"/> </output> </operation>
</binding>
Notice that SOAP binding is being used (soap:binding, soap:operation , soap:body tags). All we need to do to persuade the BPEL to use WSIF is to change the binding information without changing the structure of the contract. As long as the contract is the same and references the same operations that the Java class exposes, and the messages in the contract are in conformance with the data types and parameters of the class, changing the binding will only change the way the BPEL communicates with the class, nothing else.
Definitions tag
Open the WSDL for the J2EE service in JDeveloper. Click on the source tab because you are going to edit it. Start by defining the two namespaces used by WSIF providers in the root element of the WSDL document, thetag. The format namespace is used to define the type mappings and the java namespace to define the operation mappings and the full name of the Java class:
<definitions name="Concatenation" targetNamespace="http://blogspot.nebulasky.com/" xmlns="http://schemas.xmlsoap.org/wsdl/" xmlns:tns="http://blogspot.nebulasky.com/" xmlns:soap12="http://schemas.xmlsoap.org/wsdl/soap12/" xmlns:mime="http://schemas.xmlsoap.org/wsdl/mime/" xmlns:tns0="http://blogspot.nebulasky.com/types/" xmlns:xsd="http://www.w3.org/2001/XMLSchema" xmlns:format="http://schemas.xmlsoap.org/wsdl/formatbinding/" xmlns:java="http://schemas.xmlsoap.org/wsdl/java/" xmlns:soap="http://schemas.xmlsoap.org/wsdl/soap/">
Map Java types to XML Schema definitions
To generate Java to XML mapping we need to create XML facades. These façades are Oracle BPEL Process Manager's original Java-to-XML binding for WSIF. XML façades are a set of Java interfaces and classes through which you can access and modify XML data stored in BPEL variables in a relatively easy way using get/set methods. Here we need the mappings for the WSDL file for the J2EE service. For this, you need to use the schema compiler utility called schemac as:
C:\com\nebulasky\blogspot\>schemac Concatenation.wsdl
First, you indicate to the BPEL process that it is bound to native Java code and not to a SOAP service. This is how you do it:
<binding name="JavaBinding" type="tns:WSIFTestProcess">
<java:binding/>
Next, you specify that XSD types will be mapped onto Java types. For this use the format:typeMapping tag. Then you define what Java types shall be used for what xsd types by using the format:typeMap tag. Here is the snippet that does these two tasks for you:
<format:typeMapping encoding="Java" style="Java">
<format:typeMap typeName="xsd:string" formatType="String"/> </format:typeMapping>
Mapping Java methods to WSDL operations
The final step is now to map the Java method calls onto the WSDL operations. This is done using the java:operation tag to identify which Java method should be used to support a given operation:
<operation name="getConcatenation">
<java:operation methodName="getConcatenation"/>
<input/>
<output/>
</operation>
</binding>
Define the Service
We are through with most of it now. All that remains is defining the service. Here you will provide a Java address unlike a SOAP address which is how it was untill recently:
<service name="Concatenation"> <port name="JavaPort" binding="tns:JavaBinding">
<java:address className="com.nebulasky.blogspot.ConcatString"/>
</port>
Deploy the class
For it to work at runtime then the Process Manager must be able to find the Java classes referenced in the WSIF. When using WSIF the classpath for the invoked WSIF service is different to the classpath for the BPEL process. It is necessary to move the classes to the <BPEL_HOME>/system/classes directory. Here the classes are the the ones generated by the schemac command and the class responsible for the concatenation.
Test the process
If it is not already thus, ensure that the BPEL process takes the Concatenation.wsdl file from the current directory and not from the Web service itself. The bpel.xml file should look like this:
<partnerLinkBinding name="Concatenation"> <property name="wsdlLocation">Concatenation.wsdl</property>
</partnerLinkBinding>
Test the process. It should give you the expected result.
The alternatives to calling Java from BPEL aren't legion. Infact, there are only three.
- Using Java embedding to call the code directly
- Wrapping the code in a SOAP service
- Calling the code using Web Service Invocation Framework
The pros and cons
Java Embedding: This is an out of box feature provided by BPEL to aid the developer to write and use Java snippets inside the BPEL environment. The greatest advantage is it lets the developer have full access to the entire BPEL environment. Consequently, direct manipulation of data inside the process is fairly easy. Add to it the ease of use, since you don't need to create auxiliary artifacts that you need with the other approaches, you are spared a lot of effort. On the flip side, it makes the BPEL code a little unreadable as you have mixed up Java with the BPEL tags. Use this to do seemingly simple tasks with short Java snippets.
SOAP Service: If you already have the Java code, wrapping it up as a SOAP service with JDeveloper is a peice of cake. Advantage is it lends a lot of reusability to the code and keeps your BPEL process clean. The disadvantage is that the reusability comes at a cost. You have to bear with the SOAP overhead, which can be tremendous especially if you are running a BPEL process that is swamped with SOAP calls. Use this when the service needs to be accessible from multiple machines and different BPEL processes or other applications.
WSIF: Without compromising much on readabiliy and resusability, WSIF provides a cleaner approach to use native code. By keeping the code separate from BPEL it makes sure that readability isn't sacrificed. Also, it calls the code directly, thereby eliminating the SOAP overhead altogether. Finally the code can easily be re-used by other BPEL processes by deploying the jar file containing the java classes and the WSDL document as part of a BPEL suitcase.
Prerequisites
Now that we have looked into the inherent positives and negatives of the three approaches, lets get ahead with the subject matter of this post - using WSIF to call java code. For the sake of demonstration, I shall use a Java class that takes a string as a parameter and concatenates it with another string. Here is code:
package com.nebulasky.blogspot;
public class ConcatString {
public ConcatString() { }
public String getConcatenation(String input)
{
return "Hello " + input;
}
}
Now, use JDeveloper and publish this as a J2EE service. Deploy and test it. Create a BPEL process and invoke this service. Fairly simple. Once these are done, we are all set to bring WSIF into the picture.
The WSIF file
To reiterate our purpose, we are going to tweak the BPEL to use WSIF to call the Java class instead of using SOAP. It makes sense to look at the WSDL file for the J2EE service. Of special interest is the binding section of the WSDL, since this tells our BPEL process how to call the service. I have omitted the rest of the file for simplicity, as they simply specify the data format for the messages. Here is an excerpt from the WSDL:
<binding name="ConcatenationSoapHttp" type="tns:Concatenation">
<soap:binding style="document" transport="http://schemas.xmlsoap.org/soap/http"/>
<operation name="getConcatenation">
<soap:operation soapAction="http://blogspot.nebulasky.com/getConcatenation"/>
<input> <soap:body use="literal"/>
</input>
<output>
<soap:body use="literal"/> </output> </operation>
</binding>
Notice that SOAP binding is being used (soap:binding, soap:operation , soap:body tags). All we need to do to persuade the BPEL to use WSIF is to change the binding information without changing the structure of the contract. As long as the contract is the same and references the same operations that the Java class exposes, and the messages in the contract are in conformance with the data types and parameters of the class, changing the binding will only change the way the BPEL communicates with the class, nothing else.
Definitions tag
Open the WSDL for the J2EE service in JDeveloper. Click on the source tab because you are going to edit it. Start by defining the two namespaces used by WSIF providers in the root element of the WSDL document, the
<definitions name="Concatenation" targetNamespace="http://blogspot.nebulasky.com/" xmlns="http://schemas.xmlsoap.org/wsdl/" xmlns:tns="http://blogspot.nebulasky.com/" xmlns:soap12="http://schemas.xmlsoap.org/wsdl/soap12/" xmlns:mime="http://schemas.xmlsoap.org/wsdl/mime/" xmlns:tns0="http://blogspot.nebulasky.com/types/" xmlns:xsd="http://www.w3.org/2001/XMLSchema" xmlns:format="http://schemas.xmlsoap.org/wsdl/formatbinding/" xmlns:java="http://schemas.xmlsoap.org/wsdl/java/" xmlns:soap="http://schemas.xmlsoap.org/wsdl/soap/">
Map Java types to XML Schema definitions
To generate Java to XML mapping we need to create XML facades. These façades are Oracle BPEL Process Manager's original Java-to-XML binding for WSIF. XML façades are a set of Java interfaces and classes through which you can access and modify XML data stored in BPEL variables in a relatively easy way using get/set methods. Here we need the mappings for the WSDL file for the J2EE service. For this, you need to use the schema compiler utility called schemac as:
C:\com\nebulasky\blogspot\>schemac Concatenation.wsdl
First, you indicate to the BPEL process that it is bound to native Java code and not to a SOAP service. This is how you do it:
<binding name="JavaBinding" type="tns:WSIFTestProcess">
<java:binding/>
Next, you specify that XSD types will be mapped onto Java types. For this use the format:typeMapping tag. Then you define what Java types shall be used for what xsd types by using the format:typeMap tag. Here is the snippet that does these two tasks for you:
<format:typeMapping encoding="Java" style="Java">
<format:typeMap typeName="xsd:string" formatType="String"/> </format:typeMapping>
Mapping Java methods to WSDL operations
The final step is now to map the Java method calls onto the WSDL operations. This is done using the java:operation tag to identify which Java method should be used to support a given operation:
<operation name="getConcatenation">
<java:operation methodName="getConcatenation"/>
<input/>
<output/>
</operation>
</binding>
Define the Service
We are through with most of it now. All that remains is defining the service. Here you will provide a Java address unlike a SOAP address which is how it was untill recently:
<service name="Concatenation"> <port name="JavaPort" binding="tns:JavaBinding">
<java:address className="com.nebulasky.blogspot.ConcatString"/>
</port>
Deploy the class
For it to work at runtime then the Process Manager must be able to find the Java classes referenced in the WSIF. When using WSIF the classpath for the invoked WSIF service is different to the classpath for the BPEL process. It is necessary to move the classes to the <BPEL_HOME>/system/classes directory. Here the classes are the the ones generated by the schemac command and the class responsible for the concatenation.
Test the process
If it is not already thus, ensure that the BPEL process takes the Concatenation.wsdl file from the current directory and not from the Web service itself. The bpel.xml file should look like this:
<partnerLinkBinding name="Concatenation"> <property name="wsdlLocation">Concatenation.wsdl</property>
</partnerLinkBinding>
Test the process. It should give you the expected result.
Tuesday, August 19, 2008
Security: Enabling SSL in OC4J
Securing the channel
Of the myriad ways to lend security to your enterprise, one that you certainly cannot afford to miss is securing the channel over which your partners communicate with you. An important step in this direction is configuring HTTPS on the OC4J. This is the subject matter of this post. Readers would do well to realize that this is not the final security enforcement point, but merely one among the plethora of policies that one must have in place.
Create a keystore
Your first step is to create a keystore (nothing but a repository of security certificates). Open command prompt and navigate to <JDEV_HOME>\jdk\bin directory. Now, use SUN's keytool to generate the keystore:
keytool -genkey -dname "CN=Sankash Thakuria, OU=Oracle, O=Fujitsu Consulting, L=Bangalore, S=Karnataka, C=IN" -keyalg RSA -sigalg Sha1WithRSA -keypass sankash -storepass sankash -keystore sankashkeystore.jks -alias nebulasky
Copy sankashkeystore.jks to <ORACLE_HOME>/j2ee/home/config.
Configure SSL in OC4J
The default behavior of the OC4J is to expose all resources (services) over HTTP, which is in turn is because of certain settings that are already in place in <ORACLE_HOME>/j2ee/home/config/default-web-site.xml file. We shall override this file to achieve SSL over HTTP. Create a copy of this file under the config directory and rename it as secure-web-site.xml. Open secure-web-site.xml in your favourite text editor and do the following:
- Inside the <web-site> tag, change the port to 4443 and add the element secure="true".
- Add <ssl-config> element and and point this to the newly created keystore.
Here is how the file will look like once these are done:
...
<ssl-config keystore="sankashkeystore.jks" keystore-password="sankash" />
...
Now, you need to make the OC4J aware of these changes. To do that, go ahead and open the server.xml file. Add the following to the file:
<web-site default="true" path="./default-web-site.xml" />
<web-site path="./secure-web-site.xml" />
Bounce OC4J and test
Restart the container and test. For instance, if the BPEL console was available over http://172.28.10.60:7777/BPELConsole it should now be also available over https://172.28.10.60:4443/BPELConsole provided the entry for the same exists in the secure-website.xml file.
Wednesday, August 6, 2008
Calling BPEL from PL/SQL
The UTL_HTTP package
Calling PL/SQL code from BPEL is a walk in the park. But what if you want to do the opposite? Is there a way? Well, fortunately, there is. Oracle 9i/10g comes intact with the UTL_HTTP package that can be used to access data on the Internet over the HTTP protocol. With a little tweaking you can leverage its functionality to call BPEL processes. And I shall show you exactly how to do it.
Declare variables
We declare the following PL/SQL variables
Since SOAP is widely recognised as an industry standard to communicate with services avaialble over the internet, your first task is to create the message. For the sake of convinience, I shall assume that there is a synchronous BPEL process in place that accepts a string as input and concatenates the string with 'Hello' - a typical HelloWorld BPEL process. Initialize the request_envelope variable with the SOAP message as shown below
request_envelope :=
'<?xml version="1.0" encoding="UTF-8"?>
<soap:Envelope xmlns:soap="http://schemas.xmlsoap.org/soap/envelope/">
<soap:Header/>
<soap:Body xmlns:ns1="http://xmlns.oracle.com/HelloWorld">
<ns1:HelloWorldProcessRequest>
<ns1:input>Sankash</ns1:input>
</ns1:HelloWorldProcessRequest>
</soap:Body>
</soap:Envelope>';
BEGIN_REQUEST
BEGIN_REQUEST begins a new HTTP request. When the function returns, the UTL_HTTP package has established the network connection to the target Web server, and has sent the HTTP request line. This function takes three parameters which are
http_request :=
utl_http.begin_request(
url => 'http://172.28.0.54:7777/orabpel/default/HelloWorld/1.0', method => 'POST', http_version => 'HTTP/1.1');
Header information
The next step is to set the header information. For this we shall use SET_HEADER function. This function sets a HTTP request header. The request header is sent to the Web server as soon as it is set. The function takes three parameters which are
utl_http.set_header(
r => http_request,
name => 'Content-Type',
VALUE => 'text/xml');
utl_http.set_header(
r => http_request,
name => 'Content-Length',
VALUE => LENGTH(request_envelope));
utl_http.set_header(
r => http_request,
name => 'SOAPAction',
VALUE => 'process');
WRITE_TEXT
This function writes text data in the HTTP request body. As soon as some data is sent as the HTTP request body, the HTTP request headers section is completed. Text data is automatically converted from the database character set to the request body character set. This function takes two parameters
GET_RESPONSE
This procedure reads the HTTP response. When this procedure returns, the status line and the HTTP response headers have been read and processed. The status code, reason phrase and the HTTP protocol version are stored in the response record. We shall call this in the following way
http_response := utl_http.get_response(r => http_request);
READ_TEXT
This reads the HTTP response body in text form and returns the output in the caller-supplied buffer. The end_of_body exception will be raised if the end of the HTTP response body is reached. Text data is automatically converted from the response body character set to the database character set. It takes two parameters
utl_http.read_line(r => http_response, data => response_envelope);
END_RESPONSE
This ends the HTTP response. This completes the HTTP request and response cycle. The function takes only one parameter which is the HTTP response object.
Use it like this
utl_http.end_response(http_response);
Handle Exceptions
To take care of any inadvertent exceptions that may arise we embed the following exception handling block in our code
EXCEPTION
WHEN utl_http.end_of_body
THEN utl_http.end_response(http_response);
WHEN utl_http.request_failed THEN
DBMS_OUTPUT.PUT_LINE('Request Failed: ' utl_http.get_detailed_sqlerrm);
WHEN utl_http.http_server_error THEN
DBMS_OUTPUT.PUT_LINE('Server Error: ' utl_http.get_detailed_sqlerrm);
WHEN utl_http.http_client_error THEN
DBMS_OUTPUT.PUT_LINE('Client Error: ' utl_http.get_detailed_sqlerrm);
WHEN others THEN
DBMS_OUTPUT.PUT_LINE(sqlerrm);
Gotchas
So far so good. But when you try to read the output you in your PL/SQL code you are almost certain to get this error, because in most of the cases the output from the BPEL process will be verbose.
ORA-20000: ORU-10028: line length overflow, limit of 255 chars per line
This is because DBMS_OUTPUT.PUT_LINE can write a maximum of 255 characters in one line as the error says. Thus you will have to break the output into multiple lines. To get round this problem I shall use the following piece of code. This restricts the number of characters per line to 255. Extra characters are passed onto the next line.
FOR i IN 1 .. MOD(LENGTH(response_envelope), 255)
LOOP
DBMS_OUTPUT.PUT_LINE(SUBSTR(response_envelope, j, 255));
j := j + 255;
END LOOP;
That is all. Check the BPEL console to ensure that the process was successfully initiated.
Calling PL/SQL code from BPEL is a walk in the park. But what if you want to do the opposite? Is there a way? Well, fortunately, there is. Oracle 9i/10g comes intact with the UTL_HTTP package that can be used to access data on the Internet over the HTTP protocol. With a little tweaking you can leverage its functionality to call BPEL processes. And I shall show you exactly how to do it.
Declare variables
We declare the following PL/SQL variables
- request_envelope VARCHAR2(30000): This is the SOAP request that will be sent to the BPEL process
- response_envelope VARCHAR2(30000): The response message relayed back by the BPEL process after the request has been successfully served
- http_request utl_http.req: The PL/SQL abstraction of the HTTP request sent to the web server
- http_response utl_http.resp: The PL/SQL abstraction of the HTTP respone delegated to the caller
Since SOAP is widely recognised as an industry standard to communicate with services avaialble over the internet, your first task is to create the message. For the sake of convinience, I shall assume that there is a synchronous BPEL process in place that accepts a string as input and concatenates the string with 'Hello' - a typical HelloWorld BPEL process. Initialize the request_envelope variable with the SOAP message as shown below
request_envelope :=
'<?xml version="1.0" encoding="UTF-8"?>
<soap:Envelope xmlns:soap="http://schemas.xmlsoap.org/soap/envelope/">
<soap:Header/>
<soap:Body xmlns:ns1="http://xmlns.oracle.com/HelloWorld">
<ns1:HelloWorldProcessRequest>
<ns1:input>Sankash</ns1:input>
</ns1:HelloWorldProcessRequest>
</soap:Body>
</soap:Envelope>';
BEGIN_REQUEST
BEGIN_REQUEST begins a new HTTP request. When the function returns, the UTL_HTTP package has established the network connection to the target Web server, and has sent the HTTP request line. This function takes three parameters which are
- url : The end-point for the service you wish to invoke. This will typically be the URL of the BPEL process
- method : POST or GET.
The "GET" method is suitable for non-parameterized URLs or for URLs with a manageable volume of parameter name-value pairs. The maximum length of the URL string is limited by the capacity of the PL/SQL VARCHAR2 variable used to pass it.
The "POST" method is suitable for parameterizing the request with an arbitrarily large volume of data, especially for example as might be the case when the request is expressed as an XML document.
- http_version : the version of HTTP like 1.0 or 1.1 etc
http_request :=
utl_http.begin_request(
url => 'http://172.28.0.54:7777/orabpel/default/HelloWorld/1.0', method => 'POST', http_version => 'HTTP/1.1');
Header information
The next step is to set the header information. For this we shall use SET_HEADER function. This function sets a HTTP request header. The request header is sent to the Web server as soon as it is set. The function takes three parameters which are
- r : The http request object
- name : The header name
- value : The header value
utl_http.set_header(
r => http_request,
name => 'Content-Type',
VALUE => 'text/xml');
utl_http.set_header(
r => http_request,
name => 'Content-Length',
VALUE => LENGTH(request_envelope));
utl_http.set_header(
r => http_request,
name => 'SOAPAction',
VALUE => 'process');
WRITE_TEXT
This function writes text data in the HTTP request body. As soon as some data is sent as the HTTP request body, the HTTP request headers section is completed. Text data is automatically converted from the database character set to the request body character set. This function takes two parameters
- r : The http request object
- data : The text data that forms the request. In our case this is the SOAP message
This is how we will call this function
utl_http.write_text(r => http_request, data => request_envelope);GET_RESPONSE
This procedure reads the HTTP response. When this procedure returns, the status line and the HTTP response headers have been read and processed. The status code, reason phrase and the HTTP protocol version are stored in the response record. We shall call this in the following way
http_response := utl_http.get_response(r => http_request);
READ_TEXT
This reads the HTTP response body in text form and returns the output in the caller-supplied buffer. The end_of_body exception will be raised if the end of the HTTP response body is reached. Text data is automatically converted from the response body character set to the database character set. It takes two parameters
- r : the HTTP response object
- data : the text data of the response. In our case this is the SOAP response
utl_http.read_line(r => http_response, data => response_envelope);
END_RESPONSE
This ends the HTTP response. This completes the HTTP request and response cycle. The function takes only one parameter which is the HTTP response object.
Use it like this
utl_http.end_response(http_response);
Handle Exceptions
To take care of any inadvertent exceptions that may arise we embed the following exception handling block in our code
EXCEPTION
WHEN utl_http.end_of_body
THEN utl_http.end_response(http_response);
WHEN utl_http.request_failed THEN
DBMS_OUTPUT.PUT_LINE('Request Failed: ' utl_http.get_detailed_sqlerrm);
WHEN utl_http.http_server_error THEN
DBMS_OUTPUT.PUT_LINE('Server Error: ' utl_http.get_detailed_sqlerrm);
WHEN utl_http.http_client_error THEN
DBMS_OUTPUT.PUT_LINE('Client Error: ' utl_http.get_detailed_sqlerrm);
WHEN others THEN
DBMS_OUTPUT.PUT_LINE(sqlerrm);
Gotchas
So far so good. But when you try to read the output you in your PL/SQL code you are almost certain to get this error, because in most of the cases the output from the BPEL process will be verbose.
ORA-20000: ORU-10028: line length overflow, limit of 255 chars per line
This is because DBMS_OUTPUT.PUT_LINE can write a maximum of 255 characters in one line as the error says. Thus you will have to break the output into multiple lines. To get round this problem I shall use the following piece of code. This restricts the number of characters per line to 255. Extra characters are passed onto the next line.
FOR i IN 1 .. MOD(LENGTH(response_envelope), 255)
LOOP
DBMS_OUTPUT.PUT_LINE(SUBSTR(response_envelope, j, 255));
j := j + 255;
END LOOP;
That is all. Check the BPEL console to ensure that the process was successfully initiated.
Tuesday, August 5, 2008
Accessing BPEL variables from within XSLT
What's new?
XSLT is a remarkable technology, and I almost always prefer using it over other alternatives, most notably JAVA(of course there are times when nothing else will work and JAVA enticingly fits the bill). However, very often one is tempted to write JAVA snippets, and expose them as webservices to accomplish a task, when the same could be achived using XSLT with minimal or no coding.
Most of us are aware that BPEL PM provides an out of box function ora:processXSLT to execute an XSL template. The signature of the function is pretty well known.
ora:processXSLT('template','input','properties'?)
template : The XSL File Name
input : The variable to be transformed
Very often we use only the first two parameters without giving much of a thought about the third. This post is intended unravel the mystery sorrounding this parameter.
The third parameter
Interestingly, the third parameter comes in handy when you need access to BPEL variables from within an XSL file. Withing the XSLT engine this parameter translates to XSL parameters that can be accessed within the XSL Map using the construct
<xsl:param name="<paramName>"/>
All that remains is retrieving data from this parameter within XSLT. This is relatively straight forward and is done as follows
<Name><xsl:value-of select="$param1"/></Name>
More about "properties"
For the "properties" argument to be available to the XSLT engine, it must be of type "message" that conforms to the following schema.
...
<?xml version="1.0" encoding="windows-1252" ?>
<xsd:schema xmlns:xsd="http://www.w3.org/2001/XMLSchema" xmlns="http://schemas.oracle.com/service/bpel/common" targetNamespace="http://schemas.oracle.com/service/bpel/common" elementFormDefault="qualified">
<xsd:element name="parameters">
<xsd:annotation>
<xsd:documentation> A sample element </xsd:documentation> </xsd:annotation>
<xsd:complexType>
<xsd:sequence>
<xsd:element name="item" maxOccurs="unbounded"> <xsd:complexType>
<xsd:sequence>
<xsd:element name="name" type="xsd:string"/>
<xsd:element name="value" type="xsd:string"/>
</xsd:sequence>
</xsd:complexType>
</xsd:element>
</xsd:sequence>
</xsd:complexType>
</xsd:element>
</xsd:schema>
...
Create and initialize the variable
Your first step is to import this schema into the project wsdl file. Once this is done your wsdl file should look like this
...
<types>
<schema xmlns="http://www.w3.org/2001/XMLSchema">
<import namespace="http://schemas.oracle.com/service/bpel/common" schemaLocation="Props.xsd" />
</schema>
</types>
...
Add the namespace under the definitions tag of the wsdl file like this
xmlns:ns1="http://schemas.oracle.com/service/bpel/common"
Now, go ahead and create the appropriate message types. For the sake of convinience, I have modelled my request message on top of this schema(since my intention is just to drive home the concept; readers are welcome to improvise) so that I don't need to create another variable and populate it with the contents of input variable again within the BPEL process. Instead, I shall directly use the input variable as the third argument. If you are using JDeveloper, there isn't any need to do all these manually. All you need to do is specify this schema for the input/request message when defining the process at the beginning. The designer automatically generates these fragments for you without you even knowing it. Anyways, here is my message type
...
<message name="ReadConfig1RequestMessage">
<part name="payload" element="ns1:parameters" />
</message>
...
NS:If you are not directly using the input variable, you must first create a variable that conforms to this message and populate the same with the contents of that bpel variable whose values you wish to make avaiable within the XSLT.
Anyways, here is how the third argument will look like after it has been initialized
...
<parameters xmlns:ns2="http://schemas.oracle.com/service/bpel/common" xmlns="http://schemas.oracle.com/service/bpel/common"/>
<ns2:item>
<ns2:name>Name</ns2:name>
<ns2:value>Sankash</ns2:value>
</ns2:item>
<ns2:item>
<ns2:name>Occupation</ns2:name>
<ns2:value>Software Engineer</ns2:value>
</ns2:item>
</parameters>
...
Call ora:processXSLT with the third argument
Unfortunately, the JDeveloper GUI does not support using this parameter. So, you have to do it after clicking the source tab in the designer. Just add this snippet within the tranformation
...
<copy>
<from expression="ora:processXSLT('Transformation_1.xsl',bpws:getVariableData('Invoke_1_SynchRead_OutputVariable','Configurations'),bpws:getVariableData('inputVariable','payload'))"/>
<to variable="outputVariable" part="payload"/>
</copy>
...
The XSLT snippet
Here is the xsl file. It will concat the values of the parameters which are essentially the contents of the BPEL variable (the input variable in this case). ...
<xsl:stylesheet version="1.0" ....>
<xsl:param name="Name"/>
<xsl:param name="Occupation"/>
<xsl:template match="/">
<ns1:ReadConfig1ResponseMessage>
<ns1:result>
<xsl:value-of select="concat('Name : ', $Name, ' Occupation : ',$Occupation)"/> </ns1:result>
</ns1:ReadConfig1ResponseMessage>
</xsl:template>
</xsl:stylesheet>
...
Testing the process
Save the project and deploy. Ideally the response message should containt the concatenated value of the parameters. In this case it shoudl look like this
<ns1:result>Name : Sankash Occupation : Software Engineer</ns1:result>
Monday, August 4, 2008
Creating and using custom xpath functions in BPEL
The motivation..
Recently, while tinkering with the email activity, I stumbled upon a strange but interesting discovery. I had tried to use the ora:fileread xpath function to read a text file (and subsequently send the same as an attachment) and I found that the function returned some strange text. After some more playing around, it dawned on me that the function had actually returned the Base64 encoded equivalent of the original text. So, in order to recover the original text I had to decode the encoded text. Since BPEL does not provide an out of box function to do the same, my first impulse was to write some java snippet and subsequently wrap it as web service. Then I got a better idea - using a custom xpath function that would do the decoding for me. Obviously, this was a better design inasmuch as I would no longer need to use an additional partnerlink in my BPEL process. In fact, this is the subject that I am going to cover in this post.
For ease of writing, I shall use the same code I wrote to decode Base64 encoded text. This is intended to serve as an example. Readers can improvise on it to develop their own functions.
The business logic
The first step is to write the code to decode the message, which is relatively simple.
Here is the snippet
...
private String decodeString(String str)
{
String decoded = null;
try
{
decoded = Base64Decoder.decode(str);
}
catch (UnsupportedEncodingException e)
{
e.printStackTrace();
}
return decoded;
}
...
Wrapping the code
In order that this snippet be available as XPath function we need to first implement the IXPathFunction interface. This has a single method that it requires us to implement:
public Object call(IXPathContext iXPathContext, List list) throws XPathFunctionException
Here is the implementation of the above method
private static final int NO_OF_ARGS = 1;
public Object call(IXPathContext context,List args) throws XPathFunctionException {
// test if we have the right argument number
if (args.size() != NO_OF_ARGS)
{
throw new XPathFunctionException("This function requires one argument.");
}
// extract the String of the argument from the BPEL process
Object o = args.get(0);
String str = getValue(o);
// call the business method
return decodeString(str);
}
To get the value of the object, we shall use the getValue method. The implementation of the same is shown below.
private String getValue(Object o) throws XPathFunctionException {
if (o instanceof String)
{
return ((String)o);
}
else if (o instanceof Node)
{
return ((Node)o).getNodeValue();
}
else
{
throw new XPathFunctionException("Unknown argument type.");
}
}
Adding the class to the Server
Now that we are done with the coding, we need to compile it and drop the class into $ORACLE_HOME/bpel/system/classes directory of the BPEL PM server, so that the application server has access to this class.
Registering the xpath funtion with the server
The BPEL PM needs to be aware of this new function so that you can use it. So you need to register it with the server. This is done by adding a new entry in the xpath-functions.xml file located under the $BPEL_HOME/domains/default/config directory.
<bpel-xpath-functions version="2.0.2">
<function id="decode">
<classname>callbpelfromjava.CustomXpathExtension</classname>
<comment><![CDATA[decode the string]]></comment>
<property id="namespace-uri">
<value>http://nebulasky.blogspot.com</value>
<comment>Namespace URI for this function</comment>
</property>
<property id="namespace-prefix"><value>nebulasky</value>
<comment>Namespace prefix for this function</comment>
</property>
</function>
</bpel-xpath-functions>
Setting the BPEL classpath
Edit the shared library of your application server. Navigate to $ORACLE_HOME/j2ee/oc4j_soa/config. Open the server.xml file and locate the shared library called oracle.bpel.common. Add a tag code-source with your classpath as the others code-source tags.
Edit the shared library of your application server. Navigate to $ORACLE_HOME/j2ee/oc4j_soa/config. Open the server.xml file and locate the shared library called oracle.bpel.common. Add a tag code-source with your classpath as the others code-source tags.
...
<shared-library name="oracle.bpel.common" version="10.1.3">
...
<code-source path="/u01/apps/orasoa/product/10.1.3/bpel/system/classes"/>
...
</shared-library>
...
Now, open the domain.xml and scroll down to property id = "bpelcClasspath". Ensure that the classpath is already present. If not, add it. Once these tasks are done, bounce the server.
...
<property id="bpelcClasspath">
<name>BPEL process compiler classpath</name>
<value>/u01/apps/orasoa/product/10.1.3/bpel/system/classes:/u01/apps/orasoa/product/10.1.3/bpel/lib/j2ee_1.3.01.jar:/u01/apps/orasoa/product/10.1.3/bpel/lib/xmlparserv2.jar
</value>
</property>
...
Testing the Process
Create a BPEL process in JDeveloper. Under the process tag of the bpel file add the namespace that qualifies the function. This is the same as the values of the namespace-uri/namespace-prefix you had specified in the xpath-functions.xml. Here, the namespace is http://nebulasky.blogspot.com and the prefix is nebulasky (see xpath-functions.xml).
Here is how it will look like
...
<copy>
<from expression="nebulasky:decode(bpws:getVariableData('encoded'))"/>
<to variable="outputVariable" part="payload" query="/client:CustomXpathProcessResponse/client:result"/>
</copy>
...
...
Deploy the project and initiate it. Ideally, your BPEL process should be able to decode the encoded text back to ASCII text.
Subscribe to:
Posts (Atom)